
Hier geht es zum deutschen Rezept
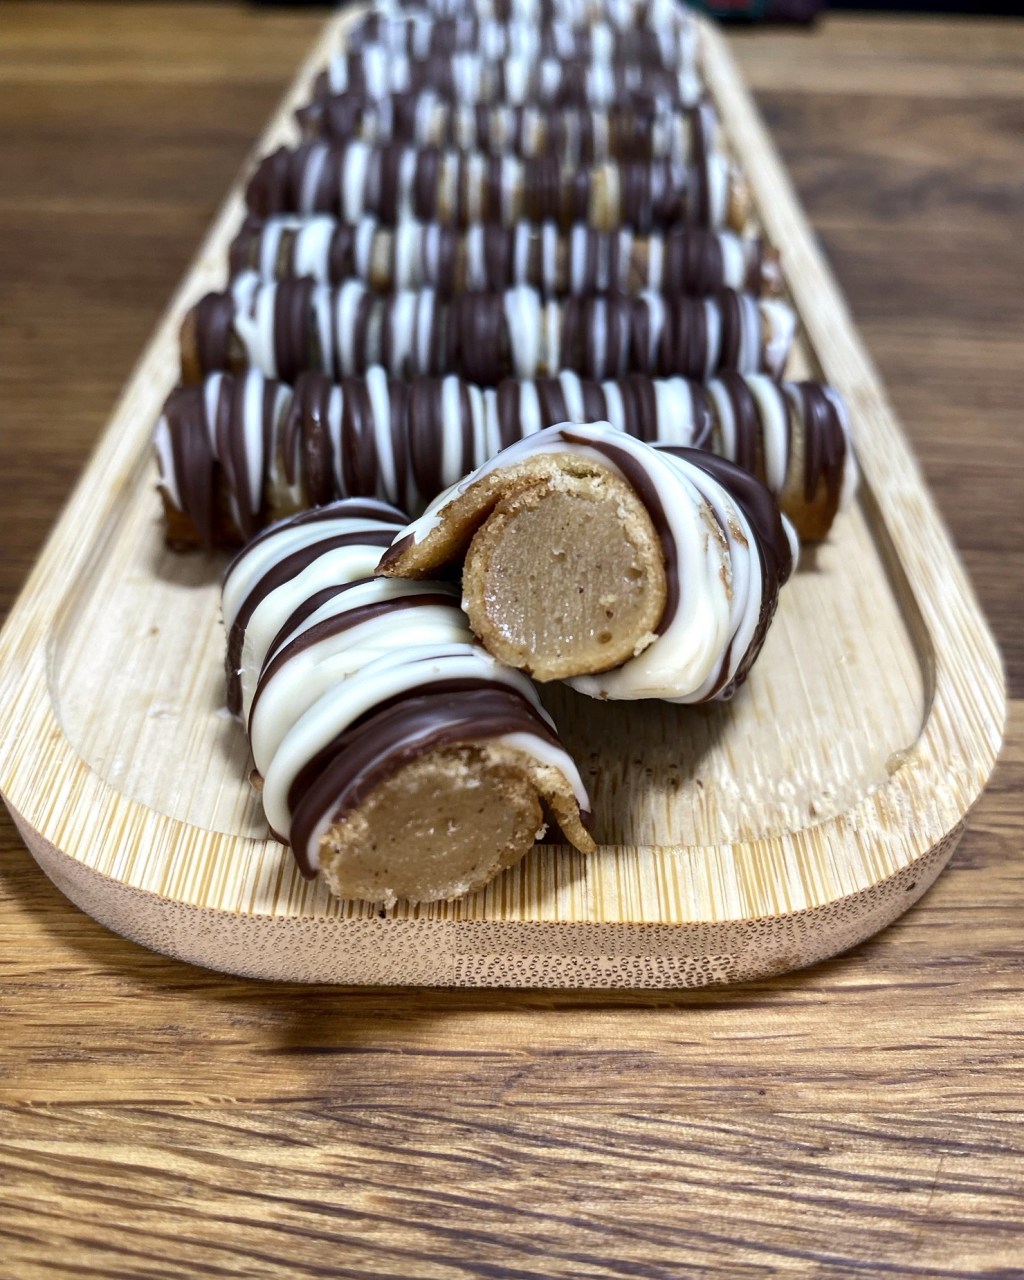
Thin, crisp waffle rolls with a smooth hazelnut cream inside, finished with chocolate. I first made this recipe for my baking exam and have been making it ever since. The rolls keep for up to 2 weeks, which makes them a great homemade Christmas gift. This recipe makes about 30 rolls.
Ingredients
Waffle Batter
- 60 g butter, at room temperature
- 60 g egg white
- 60 g powdered sugar
- 1 pinch of salt
- 60 g all-purpose flour (any type works)
Hazelnut Cream
- 50 g soft butter
- 90 g hazelnut butter (pure ground hazelnuts)
- 140 g white chocolate, melted and only hand-warm
- a little salt
Decoration
- Dark chocolate, as needed
- White chocolate, as needed
Method
1. Make the batter
Stir the soft butter with the egg white. It will not combine completely, and that is fine. It only needs to be loosely mixed.
Add the powdered sugar and the salt. Keep stirring until no butter lumps are left.
Add the flour and stir until the batter is smooth and easy to spread.
2. Prepare the stencil
The stencil gives you clean edges and the same thickness every time. I cut a rectangle out of a silicone mat. I made it for my exam and kept it to reuse it. A stencil made from cardboard works just as well. Make sure the cardboard is not too thick, because you want to spread the batter very thin, only about 1 mm. Place the stencil on a piece of baking paper that you have cut to a square shape.
The long side of the rectangle is the length of your rolls. The short side should be long enough to wrap around your roller twice, because the roll should not have more than two layers. A roll with a diameter of about 1 cm has a good balance of cream and waffle. If you do not want to make a stencil, you can also spread the batter by hand. The result will just not be as neat.
3. Spread the batter
Put the stencil on the baking paper and spread the batter into it as thinly as possible, about 1 mm. Lift the stencil off.
4. Bake the waffles
Heat the pan well before the first waffle. Bake on medium heat and adjust it as you go. Start a bit hotter and turn the heat down towards the end. The waffles should turn evenly brown. If dark spots appear too quickly, lower the heat.
Flip the baking paper onto the pan so that the batter side lies on the pan. When the batter has set a little, carefully peel the paper off from the top. When the underside is brown, turn the waffle over. You can turn it several times until it is evenly brown.
5. Roll the waffles
Roll each waffle up straight from the pan while it is still hot. It cools down very quickly, and then it breaks when you roll it. Use a roller with a diameter of about 1 cm. I use a curler that I bought for my exam. A thick metal straw, a wooden stick or anything round with about 1 cm diameter works too.
If the waffle is too hot for your fingers, put on thin winter gloves and pull rubber gloves over them.
6. Fill the rolls
Stir the soft butter until smooth. Add the hazelnut butter and stir until smooth again. Add the white chocolate, which should only be hand-warm, and a little salt. Stir everything into a homogeneous cream.
Fill the cream into a piping bag and pipe it into the rolls from both ends.
7. Decorate
Decorate the rolls with chocolate. For my exam I dipped only the ends in dark chocolate and then in coarsely ground hazelnuts. For the version in my video I drizzled the rolls with white and dark chocolate. Here you can get creative.
8. Store and gift the rolls
Keep the rolls in the fridge in a really airtight container. This way the waffles do not pull moisture and turn soft. They stay crisp and crunchy.
The rolls keep well for up to 2 weeks. That makes them perfect to prepare ahead and give as a gift. The person you give them to can enjoy them for a while and does not have to eat them all at once.
Do not worry about the temperature either. The rolls are not very sensitive. If they lie under the Christmas tree for a few hours, they will be fine. Just pack them airtight.
Haselnusswaffelrollen
Dünne, knusprige Waffelrollen mit einer glatten Haselnusscreme, verziert mit Schokolade. Dieses Rezept habe ich zum ersten Mal für meine Prüfung gemacht und backe es seitdem immer wieder. Die Rollen halten sich bis zu 2 Wochen. Deshalb sind sie ein tolles selbstgemachtes Weihnachtsgeschenk. Aus dem Rezept werden etwa 30 Rollen.
Zutaten
Waffelteig
- 60 g Butter, zimmerwarm
- 60 g Eiklar
- 60 g Puderzucker
- 1 Prise Salz
- 60 g Weizenmehl (die Type ist egal)
Haselnusscreme
- 50 g weiche Butter
- 90 g Haselnussmus (reine gemahlene Haselnüsse)
- 140 g weiße Schokolade, geschmolzen und nur handwarm
- etwas Salz
Verzierung
- Dunkle Schokolade, nach Bedarf
- Weiße Schokolade, nach Bedarf
Zubereitung
1. Den Teig anrühren
Rühre die weiche Butter mit dem Eiklar zusammen. Das verbindet sich nicht ganz, und das ist in Ordnung. Es soll nur grob vermischt sein.
Gib den Puderzucker und das Salz dazu. Rühre weiter, bis keine Butterklümpchen mehr übrig sind.
Gib das Mehl dazu und rühre, bis der Teig glatt und gut streichfähig ist.
2. Die Schablone vorbereiten
Die Schablone sorgt für saubere Ränder und immer die gleiche Dicke. Ich habe mir ein Rechteck aus einer Silikonmatte zugeschnitten. Das habe ich für meine Prüfung gemacht und wollte es wiederverwenden. Eine Schablone aus Pappe funktioniert genauso gut. Achte darauf, dass die Pappe nicht zu dick ist, denn du streichst den Teig sehr dünn auf, nur etwa 1 mm. Lege die Schablone auf ein Stück Backpapier, das du viereckig zugeschnitten hast.
Die lange Seite des Rechtecks ist die Länge deiner Rollen. Die kurze Seite sollte so lang sein, dass sie sich zweimal um deinen Wickelstab legt, denn die Rolle soll nicht mehr als zweilagig sein. Bei einem Durchmesser von etwa 1 cm passen Creme und Waffel gut zusammen. Wenn du dir keine Schablone machen möchtest, kannst du den Teig auch mit der Hand aufstreichen. Das Ergebnis wird nur nicht ganz so sauber.
3. Den Teig aufstreichen
Lege die Schablone auf das Backpapier und streiche den Teig so dünn wie möglich hinein, etwa 1 mm. Hebe die Schablone ab.
4. Die Waffeln ausbacken
Heize die Pfanne vor der ersten Waffel gut auf. Backe auf mittlerer Hitze und passe sie unterwegs an. Am Anfang darf es etwas heißer sein, zum Ende hin schaltest du herunter. Die Waffeln sollen gleichmäßig braun werden. Wenn zu schnell dunkle Stellen entstehen, nimm die Hitze zurück.
Lege das Backpapier so auf die Pfanne, dass die Teigseite auf der Pfanne liegt. Wenn der Teig ein wenig angebacken ist, ziehst du das Backpapier vorsichtig von oben ab. Wenn die Unterseite braun ist, wendest du die Waffel. Du kannst sie mehrmals wenden, bis sie schön gleichmäßig braun ist.
5. Die Waffeln aufrollen
Rolle jede Waffel direkt aus der Pfanne auf, solange sie noch heiß ist. Sie kühlt sehr schnell aus, und dann bricht sie beim Aufrollen. Nimm dafür einen Stab mit etwa 1 cm Durchmesser. Ich nehme einen Lockenwickler, den ich für meine Prüfung gekauft habe. Ein dicker Metallstrohhalm, ein Holzstab oder alles Runde mit etwa 1 cm Durchmesser geht auch.
Wenn die Waffel zu heiß für deine Finger ist, zieh dünne Winterhandschuhe an und Gummihandschuhe darüber.
6. Die Rollen füllen
Rühre die weiche Butter glatt. Gib das Haselnussmus dazu und rühre wieder glatt. Gib die weiße Schokolade dazu, die nur handwarm sein soll, und etwas Salz. Rühre alles zu einer homogenen, also gleichmäßigen Creme.
Fülle die Creme in einen Spritzbeutel und spritze sie von beiden Seiten in die Rollen.
7. Verzieren
Verziere die Rollen mit Schokolade. In meiner Prüfung habe ich nur die Enden in dunkle Schokolade und danach in grob gemahlene Haselnüsse getaucht. Bei der Variante aus meinem Video habe ich die Rollen mit weißer und dunkler Schokolade besprenkelt. Hier kannst du dich kreativ austoben.
8. Die Rollen aufbewahren und verschenken
Bewahre die Rollen im Kühlschrank auf, in einer wirklich luftdichten Dose. So ziehen die Waffeln keine Feuchtigkeit und werden nicht weich. Sie bleiben kross und knackig.
Die Rollen halten sich gut bis zu 2 Wochen. Deshalb kannst du sie perfekt vorbereiten und verschenken. Die beschenkte Person hat dann länger etwas davon und muss nicht alles auf einmal essen.
Und keine Sorge wegen der Temperatur. Die Rollen sind nicht sehr empfindlich. Wenn sie ein paar Stunden unter dem Weihnachtsbaum liegen, halten sie das gut aus. Verpacke sie nur luftdicht.


Kommentar verfassen