
Hier geht es zum deutschen Rezept
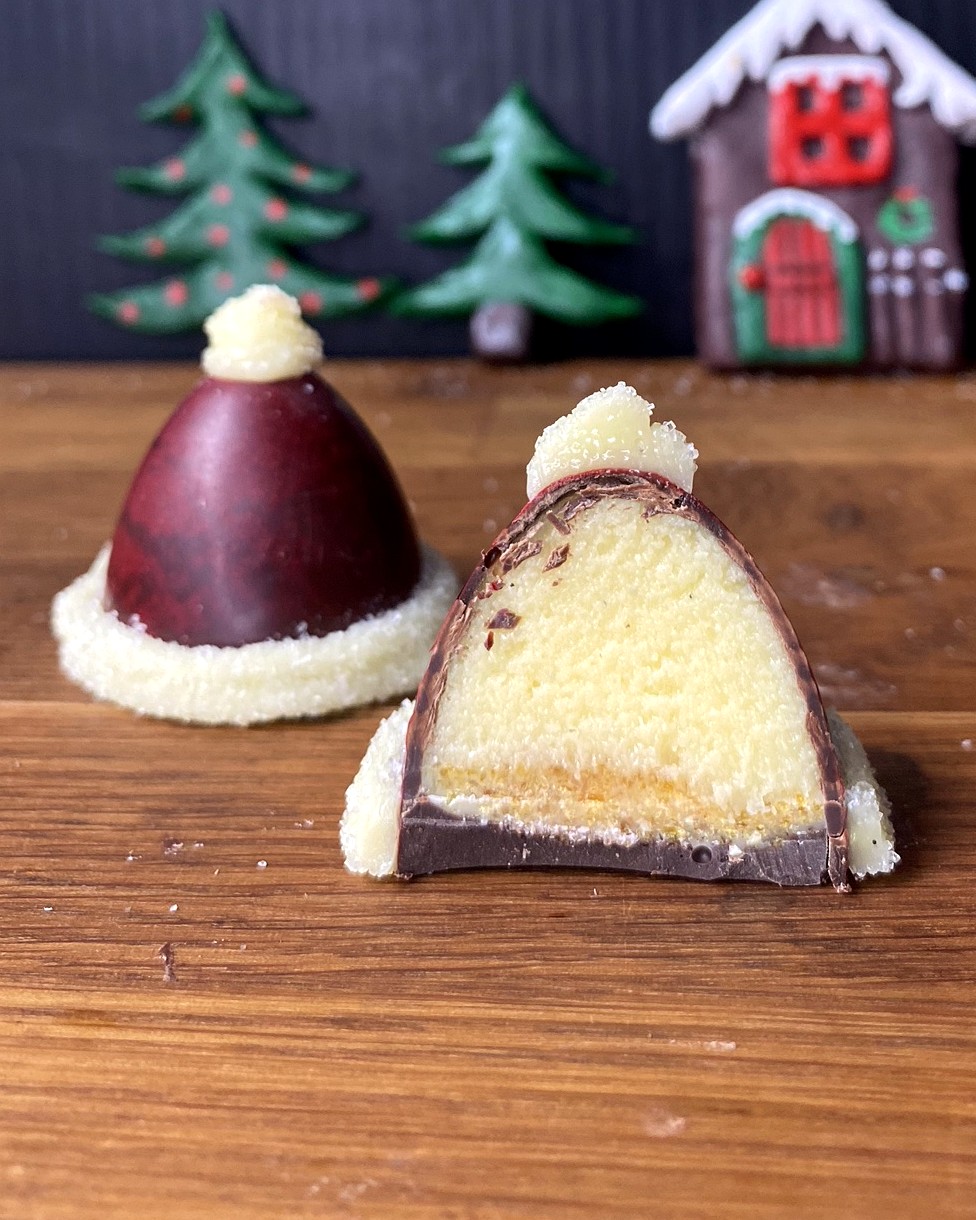
These chocolates have a thin dark chocolate shell, a soft creme brûlée filling and a crunchy caramel layer on top. You can turn them into little Christmas hats or keep it simple with domes from a silicone mold. They are the first of 15 homemade gift ideas for Christmas.
If you have little experience with chocolate, use a silicone mold. The chocolate releases easily, even if it is not perfectly tempered. Hard polycarbonate molds only work with properly tempered chocolate. It contracts as it sets, and that is what makes it come out of the mold.
Ingredients
Chocolate shells
- Dark couverture chocolate to fill the mold and to close it (amount depends on your mold)
- Colored cocoa butter, only for the Christmas hats (amount depends on your mold)
Creme brûlée filling
- 90 g soft butter
- 30 g glucose
- 40 g pasteurized egg yolk
- ½ vanilla bean
- 160 g tempered white chocolate
Crunchy caramel layer
- 50 g sugar
- 30 g cocoa butter
Decoration
- Sugar for sprinkling (Christmas hats)
- Gold food color (silicone chocolates)
Method
1. Pasteurize the egg yolk
You can buy pasteurized egg yolk or make it yourself. Pasteurizing means heating the yolk to kill germs.
Warm the yolk over a water bath (a bowl over a pot of simmering water), stirring constantly, to at least 75 °C / 167 °F. Ideally it reaches 75 to 80 °C / 167 to 176 °F. The yolk becomes slightly thicker, but it must not set or curdle. Let it cool down completely before you use it.
2. Prepare the cocoa butter (Christmas hats)
Cocoa butter gives the hats their color. You can color it yourself or buy colored cocoa butter.
Warm it to 45 °C / 113 °F, then cool it down to 27 °C / 81 °F. To cool it, work it back and forth on a cold surface until it has cooled down. This is called tabling. Then warm it up again to 30 °C / 86 °F. That is the ideal temperature for spraying.
Spray the cavities of the polycarbonate mold with the cocoa butter.
3. Temper the couverture
Tempering means warming and cooling chocolate in a controlled way. It gives the chocolate shine and a crisp snap.
Melt about two thirds of the dark couverture to 45 °C / 113 °F. You can do this in the microwave. Then add about one third solid couverture and stir until the chocolate has cooled to 31 °C / 88 °F. This is your working temperature.
4. Make the shells
Fill the cavities with the tempered couverture, turn the mold upside down so the excess runs out and scrape the rim clean with a knife. Each cavity now has a thin shell.
Let the chocolate set completely before you add the filling.
5. Make the filling
Stir the butter, glucose, egg yolk and vanilla seeds until smooth. Mix only until everything is evenly combined.
Then stir in the tempered white chocolate. It should be 29 to 30 °C / 84 to 86 °F. When you touch it with your fingers, it should not feel warm. If the chocolate is too warm, the filling can turn grainy. Stir until you have a smooth, even mass.
The filling must never be warm. If you use properly tempered white chocolate, that is not a problem. You can pipe it into the shells right away. Leave room on top for the caramel layer and the chocolate lid. How many chocolates you get depends on your mold.
6. Make the crunchy caramel layer
Caramelize the sugar dry in a pot until it has a nice golden brown color. Pour it onto a baking tray and spread it thin. Let it cool completely.
Grind the cooled caramel in a blender to very small sugar pieces. Melt the cocoa butter. It only has to be melted, an exact temperature does not matter. It should not be so hot that the sugar melts, but that does not happen quickly.
Mix the sugar pieces with the cocoa butter and spoon the mixture onto the filling so that the surface is covered.
7. Close the shells
Pour tempered couverture over the filled shells and scrape off the excess. Let it set completely.
Then turn the mold over. If the chocolate is properly tempered, it contracts and the chocolates come out of the mold.
8. Decorate
Christmas hats: Put some of the filling in the fridge until it is firm. Pipe a ring around the base of each hat and a small tip on top, then sprinkle with a little sugar.
Silicone chocolates: Spray them with a little gold color. This is the simple version. It looks elegant, tastes just as good and is easier to make.
9. Variation: chocolate bar
The filling also works in a chocolate bar. Use any mold you have at home.
Storage
Store the chocolates in an airtight container in the fridge. They keep for up to 2 weeks without any problem.
Creme Brûlée Pralinen
Diese Pralinen haben eine dünne Hülle aus Zartbitterschokolade, eine weiche Creme Brûlée Füllung und oben eine knusprige Karamellschicht. Du kannst sie als kleine Weihnachtsmützen machen oder einfach als Halbkugeln aus der Silikonform. Sie sind die erste von 15 selbstgemachten Geschenkideen für Weihnachten.
Wenn du wenig Erfahrung mit Schokolade hast, nimm eine Silikonform. Die Schokolade lässt sich gut herauslösen, auch wenn sie nicht perfekt temperiert ist. Bei harten Polycarbonatformen muss die Schokolade richtig temperiert sein. Sie zieht sich beim Festwerden zusammen und löst sich dadurch aus der Form.
Zutaten
Pralinenhüllen
- Zartbitterkuvertüre zum Ausgießen und zum Schließen der Form (Menge je nach Form)
- Gefärbte Kakaobutter, nur für die Weihnachtsmützen (Menge je nach Form)
Creme Brûlée Creme
- 90 g weiche Butter
- 30 g Glukose
- 40 g pasteurisiertes Eigelb
- ½ Vanilleschote
- 160 g temperierte weiße Schokolade
Knusperschicht
- 50 g Zucker
- 30 g Kakaobutter
Dekoration
- Zucker zum Bestreuen (Weihnachtsmützen)
- Goldfarbe (Silikonpralinen)
Zubereitung
1. Eigelb pasteurisieren
Pasteurisiertes Eigelb kannst du kaufen oder selbst machen. Pasteurisieren heißt, das Eigelb zu erhitzen, damit Keime abgetötet werden.
Erwärme das Eigelb über dem Wasserbad (eine Schüssel über einem Topf mit leicht kochendem Wasser) unter ständigem Rühren auf mindestens 75 °C. Am besten erreicht es 75 bis 80 °C. Das Eigelb wird dabei etwas dickflüssiger, darf aber nicht stocken oder gerinnen. Lass es danach komplett abkühlen.
2. Kakaobutter vorbereiten (Weihnachtsmützen)
Die Kakaobutter gibt den Mützen die Farbe. Du kannst sie selbst einfärben oder schon gefärbte Kakaobutter kaufen.
Erwärme sie auf 45 °C und kühle sie dann auf 27 °C ab. Zum Abkühlen bewegst du sie auf einer kalten Oberfläche hin und her, bis sie abgekühlt ist. Das nennt man tablieren. Erwärme sie danach wieder auf 30 °C. Das ist die ideale Temperatur zum Sprühen.
Sprühe damit die Mulden der Polycarbonatform an.
3. Kuvertüre temperieren
Temperieren heißt, Schokolade gezielt zu erwärmen und abzukühlen. Dadurch bekommt sie Glanz und einen schönen Knack.
Schmilz etwa zwei Drittel der Zartbitterkuvertüre auf 45 °C. Das geht auch in der Mikrowelle. Gib dann etwa ein Drittel feste Kuvertüre dazu und rühre, bis die Schokolade auf 31 °C abgekühlt ist. Das ist die Verarbeitungstemperatur.
4. Hüllen herstellen
Fülle die Mulden mit der temperierten Kuvertüre, drehe die Form um, damit der Überschuss herausläuft, und streife den Rand mit einem Messer sauber ab. Jede Mulde hat jetzt eine dünne Hülle.
Lass die Schokolade komplett anziehen, bevor du die Creme einfüllst.
5. Creme herstellen
Verrühre Butter, Glukose, Eigelb und das Mark der Vanilleschote glatt. Rühre nur so lange, bis alles gleichmäßig verbunden ist.
Rühre dann die temperierte weiße Schokolade unter. Sie sollte 29 bis 30 °C haben. Wenn du sie mit den Fingern anfasst, sollte sie sich nicht warm anfühlen. Ist die Schokolade zu warm, kann die Creme krisselig werden. Rühre, bis eine glatte, gleichmäßige Masse entsteht.
Die Creme darf auf keinen Fall warm sein. Mit richtig temperierter weißer Schokolade ist das kein Problem. Du kannst sie sofort in die Hüllen spritzen. Lass oben Platz für die Knusperschicht und den Schokoladendeckel. Wie viele Pralinen du bekommst, hängt von deiner Form ab.
6. Knusperschicht herstellen
Karamellisiere den Zucker trocken in einem Topf, bis er eine schöne goldbraune Farbe hat. Gieße ihn auf ein Backblech und streiche ihn dünn aus. Lass ihn komplett auskühlen.
Zerkleinere den ausgekühlten Karamell mit einem Mixer zu ganz kleinen Zuckerstückchen. Schmilz die Kakaobutter. Sie muss nur geschmolzen sein, eine genaue Temperatur ist nicht wichtig. Sie sollte nicht so heiß sein, dass der Zucker schmilzt, das passiert aber nicht so schnell.
Mische die Zuckerstückchen mit der Kakaobutter und gib die Masse mit einem Löffel auf die Creme, sodass die Oberfläche bedeckt ist.
7. Hüllen schließen
Gieße temperierte Kuvertüre über die gefüllten Hüllen und streife den Überschuss ab. Lass sie komplett fest werden.
Drehe die Form dann um. Wenn die Schokolade richtig temperiert ist, zieht sie sich zusammen und die Pralinen lösen sich aus der Form.
8. Dekorieren
Weihnachtsmützen: Stelle etwas von der Creme in den Kühlschrank, bis sie fest ist. Spritze einen Rand um den unteren Teil jeder Mütze und oben eine kleine Spitze. Bestreue sie mit etwas Zucker.
Silikonpralinen: Besprühe sie mit etwas Goldfarbe. Das ist die einfache Variante. Sie sieht edel aus, schmeckt genauso gut und ist einfacher zu machen.
9. Variante: Schokoladentafel
Die Füllung passt auch in eine Schokoladentafel. Nimm einfach die Form, die du zu Hause hast.
Aufbewahrung
Bewahre die Pralinen luftdicht verschlossen im Kühlschrank auf. Dort halten sie sich bis zu 2 Wochen problemlos.


Kommentar verfassen