
Hier geht es zum deutschen Rezept
These are my ultimate soft and juicy cinnamon rolls. The secret is pumpkin and carrot in the dough. You barely taste them, but they keep the dough incredibly moist. I even use them when I make classic cinnamon rolls and just leave out the spices.
You can choose between two fillings: pumpkin spice or chocolate. A splash of cream before baking and a quick cream syrup afterwards make them extra juicy.
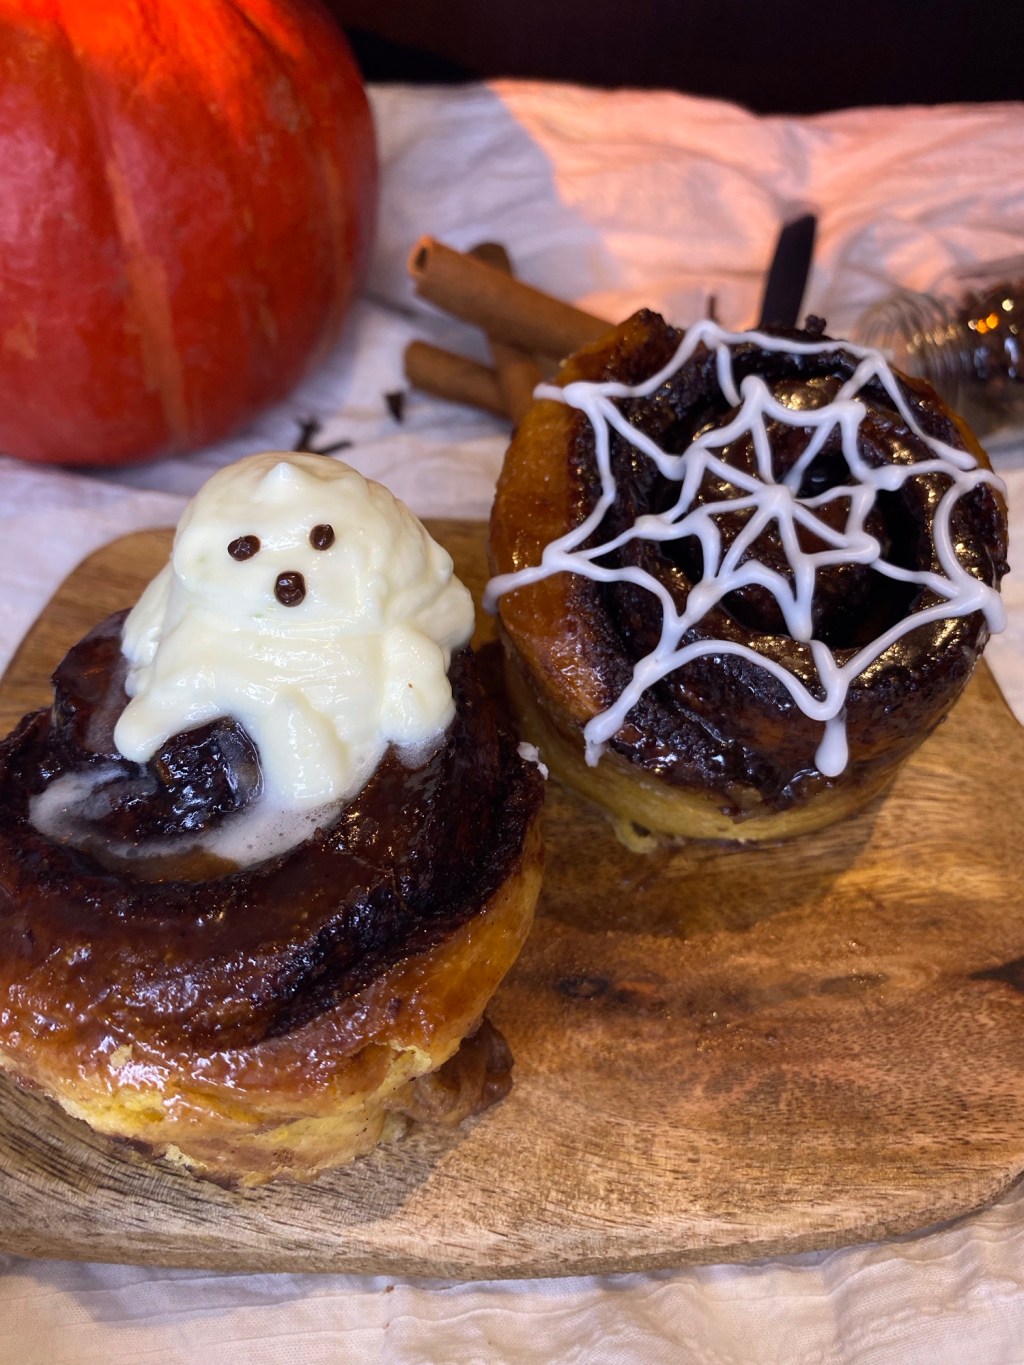
For Halloween I turned them into two cute decorations: a spider web and a little ghost. You can see both in the photo.
Makes 16 rolls.
Ingredients
Pumpkin Dough
- 200 g milk
- 150 g pumpkin purée (homemade or store-bought)
- 50 g raw carrots
- 1 tsp honey
- 6 g dry yeast
- 1 tbsp pumpkin spice
- 585 g all-purpose flour (German type 550)
- 70 g sugar
- 10 g salt
- 2 eggs
- 113 g melted butter
Filling
- 340 g soft butter
- 320 g brown sugar
- a pinch of salt
- Pumpkin spice version: 1 tbsp pumpkin spice and ½ tbsp cinnamon
- Chocolate version: 3 tbsp cocoa powder
- Classic version: only cinnamon, to taste
Before Baking
- 100 g cream
Cream Syrup
- 150 g cream
- 75 g sugar
- cinnamon and pumpkin spice, to taste
Frosting
- 50 g soft butter
- 300 g cream cheese
- 150 g powdered sugar
- a pinch of salt
- a little vanilla
Method
1. Make the pumpkin purée (optional)
Butternut or Hokkaido squash work best. Peel the squash, cut it into pieces and either boil it in water or roast it in the oven until soft. Roasting gives you more pumpkin flavour, because less of it ends up in the water. Then blend it until smooth.
2. Make the dough
Chop the carrots and blend them with the pumpkin purée until fine. Add the milk a little at a time so it doesn’t splash, and blend until you have one smooth mixture. Stir in the honey, yeast and pumpkin spice.
Put the flour, sugar, salt, eggs and melted butter into the bowl of your stand mixer, add the pumpkin mixture and knead.
Be patient here. This can take up to 10 minutes. At first the dough is very soft and sticky. The longer you knead, the more structure and stretch it gets. It’s ready when it pulls away from the side of the bowl, wraps around the dough hook in one piece and no longer sticks to your fingers.
To be sure, do the windowpane test: take a small piece of dough, wet your fingers and gently stretch it. If you can stretch it so thin that light shines through without it tearing, the gluten is fully developed. Gluten is the protein network in the flour that makes the rolls fluffy.
3. Rest overnight
Shape the dough into a ball, cover it and let it rest in the fridge for 24 hours.
4. Make the filling
Mix the soft butter, brown sugar and salt with the spices (or cocoa) of your chosen version until smooth and evenly combined. Making both versions? Halve the dough and the base filling, then flavour each half differently.
5. Roll out and fill
Take the dough out of the fridge. Cut a cross into the top and fold the four corners outwards. This gives you a rough rectangle that is much easier to roll out. Roll the dough to about 1 cm thick, roughly 30 x 40 cm.
Spread the filling evenly over the dough. Roll it up from the long side and cut the roll into 16 pieces.
6. Second rise
Place the rolls in a baking tin with about 0.5 cm space between them. You can also bake them individually, for example in a jumbo muffin tin or in small dessert rings.
Spray them lightly with water, cover them and let them rise at room temperature for at least 2 hours, until they have doubled in size.
7. Bake
Preheat the oven to 180 °C / 355 °F conventional heat. Pour the 100 g cream evenly over the rolls.
Bake for about 40 minutes. Use this as a guide and check in between. To see if they’re done, poke a small knife or skewer into the middle of a roll. The dough inside should be fluffy and baked, not raw.
8. Brush with cream syrup
While the rolls bake, bring the cream, sugar and spices to a boil in a larger pot (cream boils over quickly) and stir often. Let it simmer until it thickens slightly and coats a spoon in a thin layer. Don’t cook it too long, it will thicken more as it cools.
Brush the hot rolls with the syrup as soon as they come out of the oven. Then let them cool completely.
9. Frosting
Beat the soft butter and cream cheese until smooth, then mix in the powdered sugar, salt and vanilla. Don’t overmix, or the cream cheese gets runny. Spread the frosting on the cooled rolls.
Die saftigsten Pumpkin-Spice-Zimtschnecken
Das sind meine ultimativen, saftigen Zimtschnecken. Das Geheimnis sind Kürbis und Karotte im Teig. Man schmeckt sie kaum heraus, aber sie machen den Teig unglaublich saftig. Ich nehme sie sogar für klassische Zimtschnecken und lasse dann nur die Gewürze weg.
Du kannst zwischen zwei Füllungen wählen: Pumpkin Spice oder Schoko. Ein Schuss Sahne vor dem Backen und ein Sahnesirup danach machen sie extra saftig.
Für Halloween habe ich daraus zwei süße Deko-Varianten gemacht: ein Spinnennetz und einen kleinen Geist. Beide siehst du auf dem Foto.
Ergibt 16 Schnecken.
Zutaten
Kürbisteig
- 200 g Milch
- 150 g Kürbispüree (selbst gemacht oder gekauft)
- 50 g rohe Karotten
- 1 TL Honig
- 6 g Trockenhefe
- 1 EL Pumpkin-Spice-Gewürz (Kürbiskuchengewürz)
- 585 g Weizenmehl Type 550
- 70 g Zucker
- 10 g Salz
- 2 Eier
- 113 g geschmolzene Butter
Füllung
- 340 g weiche Butter
- 320 g brauner Zucker
- 1 Prise Salz
- Pumpkin-Spice-Version: 1 EL Pumpkin-Spice-Gewürz und ½ EL Zimt
- Schoko-Version: 3 EL Kakaopulver
- Klassische Version: nur Zimt, nach Geschmack
Vor dem Backen
- 100 g Sahne
Sahnesirup
- 150 g Sahne
- 75 g Zucker
- Zimt und Pumpkin-Spice-Gewürz nach Geschmack
Frosting
- 50 g weiche Butter
- 300 g Frischkäse
- 150 g Puderzucker
- 1 Prise Salz
- etwas Vanille
Zubereitung
1. Kürbispüree machen (optional)
Am besten eignen sich Butternut- oder Hokkaido-Kürbis. Schäl den Kürbis, schneide ihn in Stücke und koch ihn entweder in Wasser oder gare ihn im Ofen, bis er weich ist. Im Ofen behält er mehr Geschmack, weil weniger davon ans Wasser verloren geht. Danach fein pürieren.
2. Teig zubereiten
Schneide die Karotten klein und püriere sie mit dem Kürbispüree fein. Gib die Milch nach und nach dazu, damit nichts spritzt, und püriere alles zu einer glatten Masse. Rühr Honig, Hefe und Pumpkin-Spice-Gewürz unter.
Gib Mehl, Zucker, Salz, Eier und geschmolzene Butter in die Schüssel der Küchenmaschine, füge die Kürbismischung hinzu und knete alles.
Hier ist Geduld wichtig. Das dauert bis zu 10 Minuten. Am Anfang ist der Teig sehr weich und klebrig. Je länger du knetest, desto mehr Struktur und Elastizität bekommt er. Er ist fertig, wenn er sich vom Schüsselrand löst, als ein Klumpen um den Knethaken liegt und nicht mehr an den Fingern klebt.
Zur Sicherheit machst du die Fensterprobe: Nimm ein kleines Stück Teig, befeuchte die Finger und zieh es vorsichtig auseinander. Lässt es sich so dünn ziehen, dass du durchschauen kannst, ohne dass es reißt, ist das Gluten fertig aufgebaut. Gluten ist das Eiweißgerüst im Mehl, das die Schnecken fluffig macht.
3. Über Nacht ruhen lassen
Forme den Teig zu einer Kugel, deck ihn ab und lass ihn 24 Stunden im Kühlschrank ruhen.
4. Füllung zubereiten
Verrühre die weiche Butter, den braunen Zucker und das Salz mit den Gewürzen (oder dem Kakao) deiner Variante zu einer glatten, gleichmäßigen Masse. Du willst beide Versionen? Dann halbiere Teig und Grundfüllung und würze jede Hälfte anders.
5. Ausrollen und füllen
Nimm den Teig aus dem Kühlschrank. Schneide ihn oben über Kreuz ein und klapp die vier Ecken nach außen. So entsteht schon fast ein Rechteck, und der Teig lässt sich viel leichter rechteckig ausrollen. Roll ihn etwa 1 cm dick aus, ungefähr 30 x 40 cm.
Verteile die Füllung gleichmäßig auf dem Teig. Roll ihn von der langen Seite auf und schneide die Rolle in 16 Stücke.
6. Zweites Gehen
Setz die Schnecken mit etwa 0,5 cm Abstand in eine Form. Du kannst sie auch einzeln backen, zum Beispiel in einer großen Muffinform oder in kleinen Dessertringen.
Besprüh sie leicht mit Wasser, deck sie ab und lass sie mindestens 2 Stunden bei Raumtemperatur gehen, bis sie sich verdoppelt haben.
7. Backen
Heiz den Ofen auf 180 °C Ober-/Unterhitze vor. Gieß die 100 g Sahne gleichmäßig über die Schnecken.
Back sie etwa 40 Minuten. Das ist ein Richtwert, schau zwischendurch rein. Ob sie fertig sind, siehst du, wenn du mit einem kleinen Messer oder Schaschlikspieß in die Mitte einer Schnecke stichst. Der Teig innen sollte fluffig und durchgebacken sein, nicht roh.
8. Mit Sahnesirup bestreichen
Während die Schnecken backen, kochst du Sahne, Zucker und Gewürze in einem größeren Topf auf (Sahne kocht schnell über) und rührst dabei immer wieder um. Lass alles köcheln, bis es leicht eindickt und einen Löffel dünn überzieht. Nicht zu lange kochen, beim Abkühlen wird der Sirup noch dicker.
Bestreich die Schnecken direkt heiß aus dem Ofen mit dem Sirup. Danach lässt du sie vollständig auskühlen.
9. Frosting
Rühr die weiche Butter und den Frischkäse glatt, dann Puderzucker, Salz und Vanille unterrühren. Nicht zu lange rühren, sonst wird der Frischkäse flüssig. Streich das Frosting auf die ausgekühlten Schnecken.


Kommentar verfassen